Let me start by stating one thing. I am NOT in the same ballpark as a professional 2-way installer. Those guys do hundreds of installs a year, and have methods and reasons for doing what they do. What it takes me an hour to do, they can do something functionally equivalent in 5 minutes. My project has a different purpose, and some different purpose behind it.
This will be a multi-part set of posts, just because there’s a lot behind it. I may cross-link to some older posts, or re-posts of older websites where I described earlier installs. This whole thing is iterative, in some regards, using what I learned on one install to build on another.
And on to the first part….
First, some basic terminology to make it all make sense when I get on a roll:
- Power: 12VDC high and return
- Power High: 12VDC “positive” lead
- Return: 12VDC “negative” lead
- Ground: chassis
- accessory (“ACC”): ignition switched 12VDC
- Discrete: a logic line used only for triggering other events. Not used for powering equipment directly
Over my last few installs, I developed my basic design approach for power distribution, based on what was necessary for powering different types of equipment.
Originally, I only put constant power to the front cabin console area, and possibly to an area in the back where radios may have been installed.
In one of my last vehicles, I had several XTL series Motorola radios which made ignition switching simple – they included a circuit (and programming) within the radio to automatically turn the radio on and off with the vehicle if ACC power was supplied to that circuit through one of the interface cables. This meant I had to find ignition switched power to tap off of.
In my 2010 F-150, there were a lot of convenient places to get the ACC signal from, including the stereo (which I upgraded, so it was an easy time to splice into this wire). Since i was only using ACC as a discrete line, I didn’t need enough current to cause any damage. This was about the time I developed the bright idea to use the ACC discrete to trigger an automotive relay, which would then provide 12V from the battery feed to whatever equipment needed ignition switched power.
In the 2013 Suburban, there was a connector with power available (see post linked below), but nothing “stock” for upfitters.
Now, this time, like the suburban, there was nothing SIMPLE to grab for accessory power… but a number of people have done what some of the pros do – use an add-a-circuit tap. In my case, I added a fuse to an ignition-switched circuit.
https://www.eaton.com/us/en-us/catalog/fuses-and-fuse-holders/fuse-taps-and-add-a-circuits.html
So, one of the things I really wanted in this install was circuit breakers, rather than fuses. While this DOES mean careful selection of breaker rating (you can’t field-swap a breaker as quickly as a fuse, if the rating is wrong), it also means that in the case that there is an issue (Which should be rare!), a breaker can be reset quickly. Additionally, if something needs to be disabled, it’s quick to pull a breaker if, like me, you use aircraft-style “Klixon” breakers. These are pretty readily available on Ebay, if you don’t have other sources – they cost a bit, but it’s worth the cost in the end.
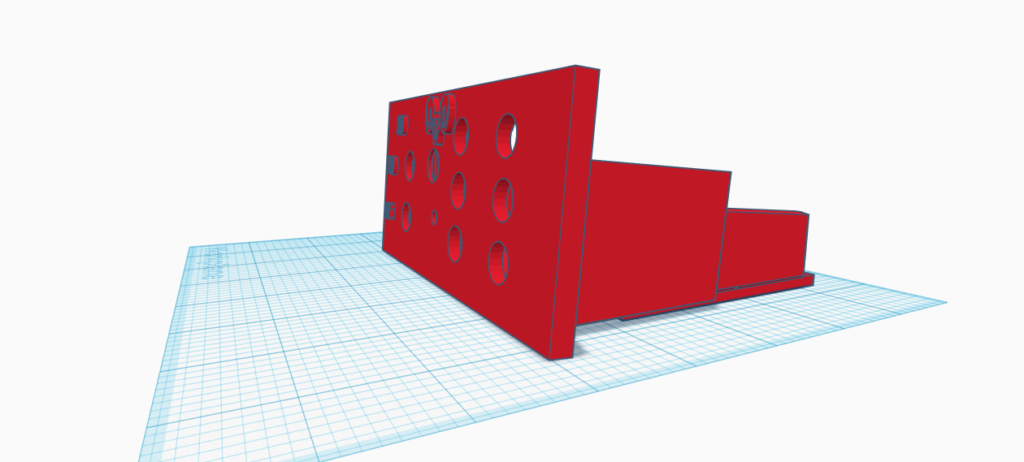
Using these breakers meant I needed to design a breaker panel, since there aren’t ready-made panels, like there are for automotive fuses. Luckily, I had a small cubby in the front of this vehicle that was a good location for such an addition, and a 3D printer to make the parts I needed. Tinkercad is awesome. The link below is my final print design:

https://www.tinkercad.com/things/km6JRfTmtrC/edit
On my last install, I needed accessory power not only in the front for control heads, but I wanted to turn some other radios on and off in the back, which presented challenges. In this case, i didn’t have ignition wires on those radios, so i needed to turn the actual radio on and off – and I didn’t have accessory power in the back. This drove the overall design concept for power on future installs.
(a short aside… at one point I DID implement a standard parallel bus, which included GPS serial data, ignition power, and other discretes on a standardized connector. This worked for low current switching, but I have not brought this design back because I did not utilize it beyond some minimal extent while I had it)

Now, with regard to power capacity for the ACC circuit – I used a 10A add-a-circuit tap, but it directly drives a 1A circuit breaker, just because I’m using it as a discrete only. the two relays shown draw significantly less than 1A for coil current. There’s several reasons for this arrangement over powering things directly form the add-a-circuit. One of the best examples of why is my CB radio (yes I still use one of those). When powered from a cigarette lighter socket, I noted a LOT of noise on the radio when accelerating, which is pretty normal for this arrangement. AM radios, by their nature, are sensitive to this, and it’s a conducted issue, meaning i would have to install some filtering to combat the noise that is, you guessed it, AMPLITUDE modulated on the DC power lines. By powering the radio from the battery as directly as possible, the battery will serve as a filter to keep this engine noise off the CB powerlines (or to minimize it). For FM or digital radios, this really shouldn’t be an issue, thus why the professionals can generally get away with powering lower powered (<10A) radios from an add-a-circuit and calling it a day.
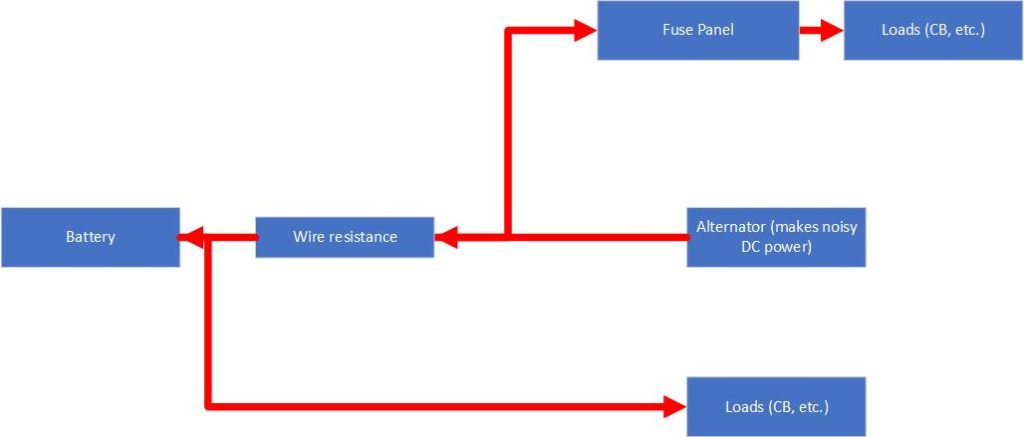
Now, I had to think this one through…. why would a line direct to the battery versus a tap on the fuse panel make a difference? The short answer is capacitance and wire resistance. First of all, the battery looks like a VERY large capacitor to filter noise off the power lines. The resistance on the wires between the noisy loads, the alternator (which generates the noise) , and the battery, keeps the battery from being able to filter the entire system. The CB will be closer to the noisy powerlines than it will to the filter. By taking a power supply direct to the battery, the noisy circuits are generally filtered by the battery before the power makes it to the radio.

Now, the above diagram is simplified, and omits a lot of things, but the minimal wire resistance shown (and it is probably MILLIOHMS at the MOST) is enough to set up a voltage that will easily modulate the front end of the radio shown at the top of the drawing, versus the one at the bottom.
Next installation of this saga, I’ll probably ramble about physical equipment installation…. maybe more power stuff… antennas…. who knows.
