With multiple station accessory devices (Headphone audio splitter, DSP unit, multiple radios, just to name a few) powered from 12V, I had a realization. There’s a LOT of wall warts in my shack, and there’s a lot of devices powered when I forget to unplug them or switch them off. I always shut my radio and it’s associated power supply off, so I wasn’t worried about that. I did want to be able to select which ones i wanted to turn on…
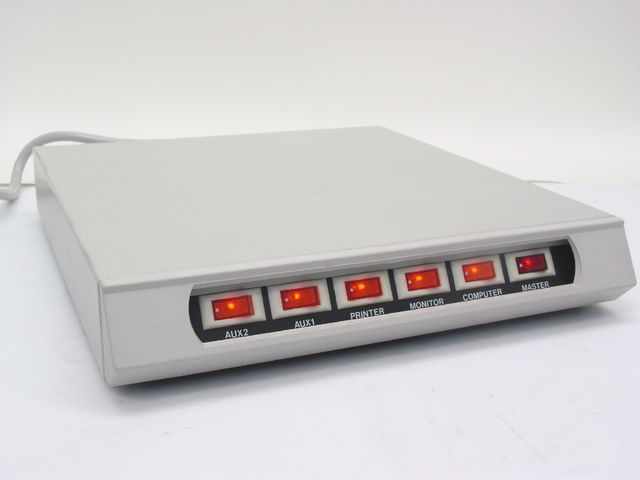
The idea I came up with was similar to those desktop computer switch panels that were big in the 2000’s… individual lighted switches for each load. I also wanted something that would, when (input) power was removed, reset to an “everything off” state, so that the accessories would not always auto-power on.
Initial Design Concept-
My first thought was that each load will be supplied power through a 12V micro relay – this way my logic can be low powered.
The basic idea for creating an auto-resetting circuit, with the button being push-on/push-off was a J-K Flip-Flop with both inputs pulled high, and the input button toggling the clock input. The output could then easily power a 2N3904 (NPN), which would switch the grounded coil lead for the relay.
This was a simple arrangement, maybe needing a 7805 to provide 5V logic power – but it’s a single-configuration solution, with little “flair”. It also requires a fair number of components for the scale (8 circuits) I wanted… dual flip-flops are common – but i’d need 4 of them, at a minimum, plus transistors, relays, etc.
Enter the bull session.
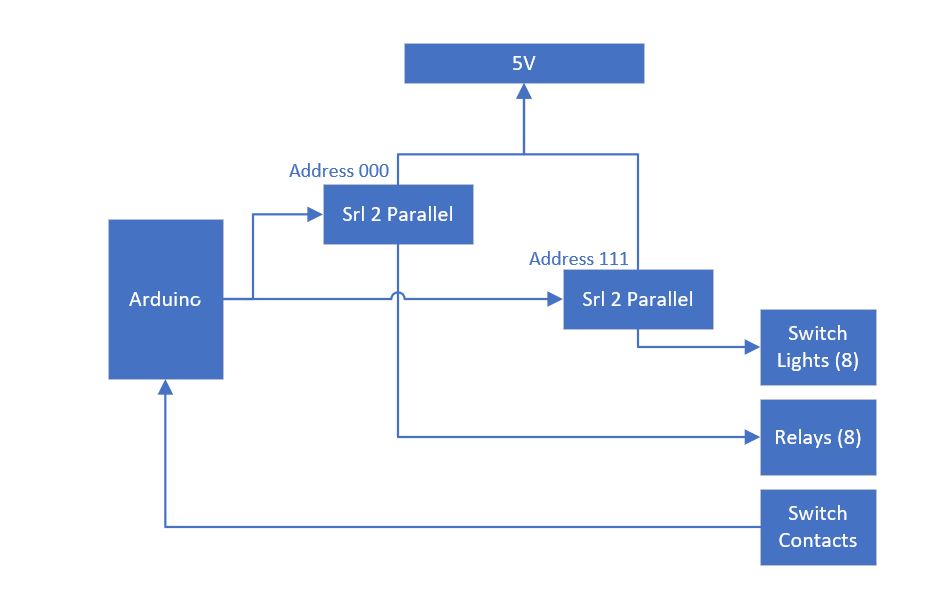
N8BDK and I were discussing it – and he mentioned harnessing an Arduino for this. The issue I had with this was the lack of I/O pins on the smaller arduinos – I think the smaller ones have ~22 pins. Since I want 8 relays, I’d need 8 inputs and 8 outputs… 16 is easy, but then I’d want an additional 8 pins to control the lighted switches, needing 24 pins would require a Mega or other larger Arduino device.
The other possibility Brian had suggested was that this type of system could even be modified to support “heavy switched loads” – like a soft-start system. Push the trigger button, and one relay closes with some resistance in the line to limit inrush, and then a second relay closes, bypassing that resistance. This is a common practice in many industries…. as far as ham radio, the first time I ran into this was when upgrading my SB-220, and integrating the famed “Harbach mods” – in addition to power supply updates and parasitic suppressors, they had a “Soft-start” module for guarding the input from inrush issues. Now, all that said, my implementation doesn’t need such a system, but it’s certainly easy enough to add, if i want to port the system to another purpose…. maybe use it to drive relays to turn amplifier functions on and off, or… well… that’s all I can envision at the moment, but I digress.
I got to thinking about it, though… and TI makes the SN74LV8153 serial-to-parallel converter (S2P). I’ve used one of these before – by feeding a formatted serial signal in, the outputs will configure and latch. As a side benefit, they’re addressable. This means I could use a single I/O pin to control 8 parallel lines. The chip also auto-recognizes serial speed, so clocking crystals and such aren’t necessary.
So, my design now has an arduino nano (22 I/Os) with 2 of these TI S2P chips in parallel (though addressed individually) on the output,

so I’ve started with some pseudo-code and real code – as I said, I’ve used the S2Ps before with success, so they’re pretty slick, as long as you make sure to properly address them. Keeping in mind that the data format for the S2P is “0-1-A1-A2-A3-D1-D2-D3-D4-1-0-1-A1-A2-A3-D5-D6-D7-D8-1”, where A’s are address bits, and D’s are Data bits, the core of the project code is here:
    bittime = 1/baudrate  //determine bit width in seconds


    OutputData1 = 0;    //start bit

    delay(bittime*1000)

    OutputData1 = 1;    //start bit

    delay(bittime*1000)

    OutputData1 = addr1;    //address bit 1

    delay(bittime*1000)

    OutputData1 = addr2;    //address bit 2

    delay(bittime*1000)

    OutputData1 = addr3;    //address bit 3

    delay(bittime*1000)

    OutputData1 = data0;    //data bit 0

    delay(bittime*1000)

    OutputData1 = data1;    //data bit 1

    delay(bittime*1000)

    OutputData1 = data2;    //data bit 2

    delay(bittime*1000)

    OutputData1 = data3;    //data bit 3

    delay(bittime*1000)

    OutputData1 = 1;    //stop bit

    delay(bittime*1000)

    OutputData1 = 0;    //start bit

    delay(bittime*1000)

    OutputData1 = 1;    //start bit

    delay(bittime*1000)

    OutputData1 = addr1;    //address bit 1

    delay(bittime*1000)

    OutputData1 = addr2;    //address bit 2

    delay(bittime*1000)

    OutputData1 = addr3;    //address bit 3

    delay(bittime*1000)

    OutputData1 = data4;    //data bit 4

    delay(bittime*1000)

    OutputData1 = data5;    //data bit 5

    delay(bittime*1000)

    OutputData1 = data6;    //data bit 6

    delay(bittime*1000)

    OutputData1 = data7;    //data bit 7

    delay(bittime*1000)

    OutputData1 = 1;    //stop bit

    delay(bittime*1000)
This is the basic code to send a state for the S2P chip. There’s obviously a lot more to the whole project – like input processing, support code, and even some “for fun” functions.
It’ll take some more work to debounce switches, integrate switches, etc. I have some ideas to use an interrupt and use switch polling with a multiplexer… but that’s the next steps.
